Sunday, May 31, 2015

My loves with Fine and Dandy

I love, love, LOVE this confetti vellum from the new American Craft line, Fine and Dandy, and just couldn't wait to use it in a layout! I started by backing up my vellum with the lets party chevron paper really making it pop for a festive look!

I wanted to create more visual fun, and chose to take my one 4x6 photo of my girls, and cut it into 3 separate photos, mating them with the F&D mint specialty paper. Below my photo and just above one I chose to use my handy scissors to create banner shapes. Adding to the festive feel of this page, I chose to create my banner out of the cheerful chatter polka dot paper, backing them with the offset of the stay wild striped paper I also used on the side of my page. Using my trusty sequins along with some pink fresh studio wood dots and gold foil hexagons in the Heidi Swapp packet, I created my trail of sparkle adding more emphasis near my photos.


Using a few chipboard frames by Heidi Swapp, I created my title and spot for the date. I love how fun these frames cane be, and I love filling them with things other than photos. I used the gold glitter numbers from Heidi Swapp. The package came with both a gold set and a silver set of the alphabet, which is such a great idea.

I also dug into the Crate Paper embellishment pack for the new journey line, seeking out some arrows and colored tags for just a bit more interest. I love how fun and festive this layout turned out, and hope it makes you as happy looking at as it does me. I feel like this fun vellum and papers just screams "celebration" but can be used for none celebratory pages!
                                                                 Brianna

Saturday, May 30, 2015

Max


Hello friends! Jennifer here on the blog today to share a layout I created with the new
Studio Calico 7Paper Baxter collection.  The prints are so whimsical with bright colors!  I couldn't wait to scrap some photos of my pug, Max with this line!  


I used a cut file from The Cut Shoppe on top of this fun "dog" print!  The A side has drawings of dogs with coordinating colors (seen below).  I cut 3 inch squares of patterned papers and embellished!

I paired some of the stars from the Baxter Puffy Shapes with wooden veneer stars from my stash (also from Studio Calico!).  


I used the Specialty Paper Rose Gold Triangle vellum over the grid print for one of my squares. I  added in a Vellum Heart from the collection, as well. 


Thanks for stopping by today! I hope this inspires you to create some pages all about your favorite pets!  Have a great weekend!


Friday, May 29, 2015

A few Jillibean Soup projects

Happy Friday, friends!  Missy here.  Earlier this month, I had the honor of Guest Designing for Jillibean Soup.  I created two layouts and two cards using the Summer Red Raspberry Soup and Saffron Yellow Pepper Soup collections.  Check them both out in the store!

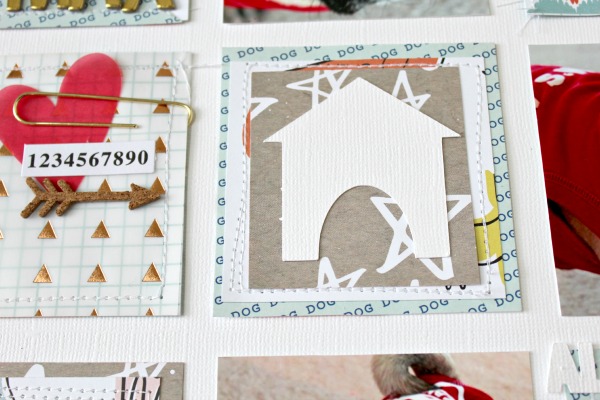
For my first layout, I started by using a square punch to create a grid design full of patterned paper squares from the Summer Red Raspberry collection.  I adhered them and stitched them down with my Brother.  Next, I came in with a little bit of gesso and watercolors to add a bit of messiness behind my photo.  I used a few pieces of patterned papers to layer behind my photo and then embellished around it with wood veneer, stickers and die cuts.


Here you can see how some of the squares aren't lying flat...that's because I added the watercolor there.  I like how it does this...it adds a bit more dimension.  I added in some tangled thread in between my layers here.


I love using my Cameo to create part of my titles, and so I cut the word "joy."  I used some of the Mini Alphas in the collection as well.


Here's one more look at the stitching and the watercolor.


Here's one of the cards I created.  I'm not the greatest card maker, so I just approached this like I would a layout without a photo.  I used the triangle placemat as a stencil and blended some Peacock Feathers Distress Ink over it.  I hand cut the wonky circles from patterned paper and then punched the large center one.  I used some white gesso to blend out some of the color right behind my die cut title.  Some thread finished it off.  I used the Saffron Yellow Pepper Soup collection for this.


I used the Saffron Yellow Pepper Soup collection to create this next page.  The background paper is from the Soup Staples III line.  There are a lot of umbrellas and rain elements in this line, and these pictures of me and my friend Jennifer getting caught in the rain at Universal Studios were perfect.  We wound up getting caught in a huge downpour right in the middle of the Harry Potter part of the park, so we found ice cream to take away the blues...haha!

I started with a triangle stencil and some gelatos.  I also added in some watercolors and inks.  I wanted to add in some yellow and teal into my background, so the watercolors and inks are perfect for that.  I added several patterned papers behind my photos and then added some machine stitching.  I decided to use the die cut "I've got Sunshine on a cloudy day" as part of my title....and then added in "also known as ice cream" because we all know that ice cream IS sunshine...haha!


I used some of coordinating stamps throughout the page.  I also threw in some tangled thread.  I cut "ice cream" on my Cameo and used some {} Thickers from my stash.  Here you can also see the mixed media pretty well.  I love the splotches!


Here's a look at the top right.  That today stamp is part of the collection.  I love the pops of yellow here.


I used one of the tab stickers here on the side.  I love how these triangles turned out.  I like that they sort of have an edge to them, yet they still look kind of faded and messy.


One more close up of the title area.  Pop dots sure make a huge difference, don't they?  I love all the dimension here.


Here's the second card I created.  I love how it turned out!  I used a sunburst stencil and some Distress Ink in Mustard Seed.  I just blended it with my small blending tool.  Then I added a little bit of blue watercolor and let it dry.  Then I just added in a few stickers and some tangled thread.  I colored the wood veneer flower yellow and glued it down.  I did add pop dots under the sentiment.


Thank you so much for your visit today!  I hope you enjoy your weekend!

Missy :)

Thursday, May 28, 2015

How to add video to your layouts

Hi there, Lisa here today to share a little tutorial for adding QR codes linked to videos on your layouts.  In the first layout I'm sharing (a little Throwback Thursday to Crate's Open Road Collection) the QR code links to a You Tube video. You can see I added a little print out of the QR code onto my layout.


I've created a close up for you so it's easier to scan.  You'll want to use any QR code reader app on your smart phone to scan the code and view the video.   I use this QR Reader app to both scan and create my codes. 


This second layout links to an Instagram video I posted.  


Here's the QR code...


To create the codes in this app, all you do is open the app and click "create".  At the top there is a little +, click that and add the url for your video, then click done. The QR code pops up.  You can then save it to your camera roll , send it in an email or copy it.  Use which ever way allows you to print easily.  I just saved it to my camera roll and then printed it out like a photo.  (I put several of them onto a 4 x 6 and put it in pic stitch to make them smaller.)  It's super easy and really addictive.  It's also a great way to free up space on your phone.  Once the videos are uploaded to You Tube, you can delete them off your phone!  I hope you've enjoyed this little tutorial today and I'd love to see your layouts with QR codes! Please upload them to our gallery and/or share on our facebook page!


Wednesday, May 27, 2015

Playing Tough and a Card

Hello there!
Lisa here today sharing a few projects I made using Pink Paislee Citrus Bliss. This line is delish and can be used for either the guy or girl pages you create.

My first project is a layout of my son playing football. This is a messy guy page.

 
Here are a few close ups:


Next I created a very feminine card:

 
So now you can see that this line can be used for both sexes, it just depends what you pair together.
 
Hope you have a wonderful day!

Lisa

Tuesday, May 26, 2015

Library.

Hello and good morning...

Happy Tuesday!! Hope you had a relaxing longer weekend. We sure did and always nice to have an extra day from the weekly routine.

Today I am sharing a layout with you from when we went to the Ronald Reagan library. We went back in September of last year, but finally got to scrapping some of the pics. We actually went since their special display was about Babe Ruth and old time baseball, since our son is a huge baseball lover.

I mainly used a bunch of the Amy Tangerine Rise and Shine collection, mainly the papers on this page.
 

I used several of the die cut embellies through the page, along with some blue misting splats:


And cut up one of the bottom strips of the arrows and added them through out the layout:


The chipboard cameras are some extremely old Studio Calico embellies that I had in my stash, and dug up to finally using up.

In case you haven't, make sure to check out the May 15 sketch on the sketch blog to play along with. The layout is for my reveal on the blog. There's still time to play, and Audrey has a great prize for a random winner.

Thanks sooo much for stopping by and have a wonderful week!!!

Monday, May 25, 2015

Happy Memorial Day!!

Happy Memorial Day to our US friends!  Please take a minute to reflect on all those that have served our country.

It's always nice to find someone who scraps some great BOY pages!  And out forum member, Tami does just that!  You can follow Tami on her Flickr gallery, here:  Tami's Flickr Gallery

I lifted one of Tami's awesome pages this week for our Scraplift Saturday!  And here is my take on her page using the True Stories collection by Shimelle for American Crafts:


Someone found Mommy's mascara.......he's such a BOY!

I stayed pretty true to Tami's design:  I loved the large bracket and the scattered embellishments.


She also inspired me to break out my stamps and do a little stamping on my background, too.


I added a piece of punched vellum under the right side of the photo because I thought it was just a bit plain.


********Store News**********


This coming weekend, May 30 and 31, is the Rubber Stamping and Scrapbooking Getaway in Syracuse!   I will be bringing the entire store to set up for the weekend and will have lots to sell!  Tickets are $6 in advance, and I have them available for purchase.  Just send me an e-mail!  They are $8 at the door.


Coming very VERY soon:

Bella Blvd Just Add Color


Simple Stories Summer Vibes


October Afternoon Summertime


*************Facebook Challenges and More**************

We are going to switch up the Sunday challenges a bit and instead of doing it weekly, we are going to do one monthly challenge and the prize will be a one month GDT spot in which the winner will receive $30 of product to make 3-4 pages and share them as challenges on our forum and FB page.

Also, starting the week of June 1, we are kicking off our GOT TALENT contest!!!   Stay tuned for more details!!


Stay scrappy my friends!


Sunday, May 24, 2015

Cousin Love with Studio Calico


I fell in love with the new Studio Calico collections, and could not wait to dig into them!!! I loved all the star papers and knew I just had to create my background by piecing together the Amelia papers 012 and 005.

I wanted to create a staggered grid with some fun frames I recently got in the shop. The larger Pink Paislee frames from the 4x4 instagram pack were perfect for housing my photo and embellishments.
I chose to use some gold and glittered Heidi Swapp frames for my title and embellishments along the top and bottom of my frame stacks.

Adding just the right touch of glitz and fun, I sprinkled the Heidi Swapp reinforcments along with my sequins on my page. I love how fun and versatile these can be, I can see them used for so many things like backing enamel dots or brads, or stand alone emellishments like I did!
 
I hope this layout inspires you to play around with your fun frames in new ways. I just Love the star paper and I hope this makes you love it too! You can see the whole Amelia collection HERE in the shop!
I hope everyone has an Amazing Sunday!!!
                                                                     Brianna

Saturday, May 23, 2015

Five

Hello and welcome to the weekend!  Hope yours is off to a great start!  Today, I'm sharing a layout I created for this week's Word Up Wednesday challenge. I used Dear Lizzy's new Fine and Dandy collection from the My Scraps and More Shop! I love the birthday themed embellishments and the fun colors of this line!  


I used of of the gold foil numbers from the Ephemera pack for my title, as well as the cute sentiment tag!  


The collection includes two sheets of 6x12 Chipboard Accents which includes these adorable candles!  For the challenge, I asked participants to incorporate an embellishment they don't use often. I still have a large jar of buttons so I decided to use a few that coordinate with the colors of the papers.  


Loving the bright colors and prints!  


Check out the My Scraps and More Shop to see this collection and much more!  
Thanks for stopping by! And don't forget to check to the forums for daily challenges and inspiration!  
Have a great day!