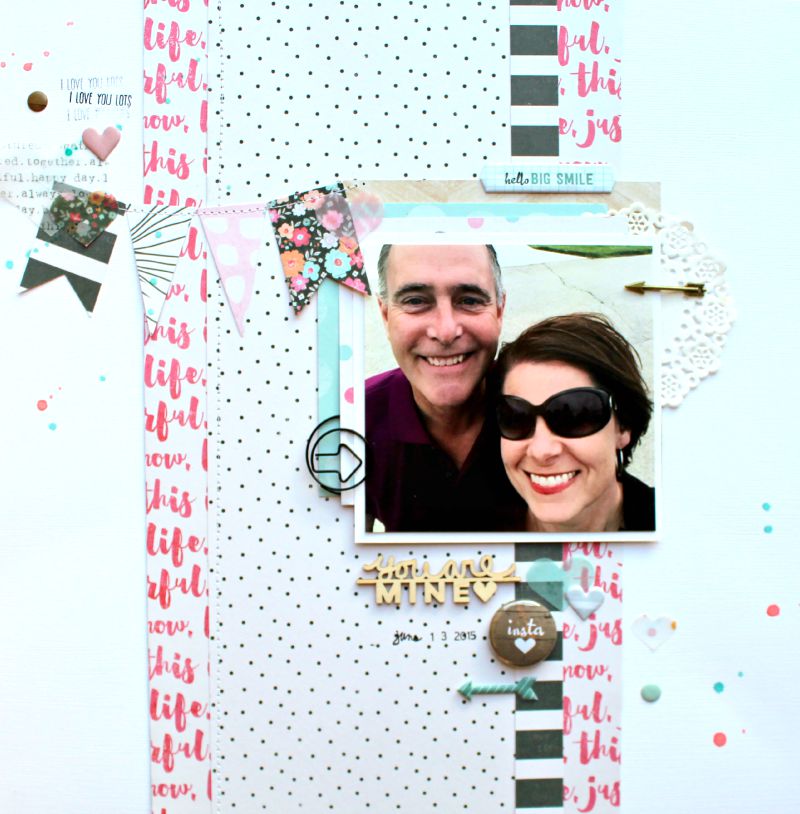
Hello! It's Saturday and that means it's my turn up on the blog! Today, I'm sharing a layout I created with Cocoa Vanilla's Hello Lovely along with pieces from Evalicious!
For my title, I used one of the adorable wooden veneer words from Evalicious' "Life's Sweet" collection. I also added a flair button from the Photo Shoot Badges v2 as well as the Puffy Stickers.
I created a banner using hand punches and stitched across my page. I then adding in a few of the Vellum Hearts from Hello Lovely.
Aren't these metal arrow Lucky Charms adorable? You receive six in each pack! What a cute accent!
These arrow Photo Clips from Evalicious are a great touch too!
Thank you for stopping by! Now head over to the My Scraps and More Shop to see these collections plus many more new items! Have a great day!
Happy Friday, friends! Missy here. I hosted this week's Trigger Tuesday Challenge, which is where we use the monthly theme to come up with the challenge. July's themes are celebrations/patriotic/stars & stripes. I challenged members to use the word CELEBRATE on their layouts and to make a shape of some sort with their title.
I learned how to created a shaped title in my Silhouette software and decided to give it a try. It was actually really easy! I learned by watching this video by Ashley Horton. I used the Amy Tan Rise & Shine collection on this, and used various patterned papers to back all those cut out letters. I like this kind of design because it automatically creates a place for your photos & embellishments to go...right inside the circle.
If you know my work, then you know I love mixed media. I went very light on this and only added a bit of ink spray and gelatos to my background. I just wanted a bit of a darker teal peeking out from under the photo and embellishments. I layered lots of paper under the photo, and I added some washi tape, that cute "love" wood veneer and a few flair buttons. I also stitched around the inner circle with grey thread.
Here's a look at the backed letters...a very easy and fun technique to get lots of color and pattern around your page without it being too busy.
I punched this "just having fun" piece from a piece of patterned paper, and that pretty clear sticker is from this collection. That cute flair button is from my stash. I love to add tangled thread under them.
Here's one last close-up of the layers and the other cute flair button.
Here's a video of how this layout came together from start to finish. Hope you enjoy!
Be sure to check out the store for all the newest collections. Thanks so much for stopping by, and have a great day!
Hi there, Lisa here today to share a layout I created with the oh so perfect, Crate Paper Poolside Collection. This isn't exactly a Throwback Thursday product as it is pretty new but you all must have loved it too, as there's almost nothing left of this line in the store. So I'm here with a little inspiration for your goodies. All of the papers and flat embellishments were cut from the papers in this line (except the cardstock backing the layout). I dug deep in my stash to find these old Prima paper flowers as they look exactly like the flowers on my daughter's costume swim cap. Some sequins were the perfect touch to act like bubbles or splashes of water and the Heidi Swapp alphabet was a perfect match for the line as well.
Hope I've inspired you to use this beautiful line...I wish there was more of it as I've used almost every little bit!!
Hey there and happy Wednesday! Lisa here today.
There was a new sketch posted over at My Scraps & More Sketches a week and a half ago and it is so fun! You are going to love it!
I used some photos of my daughter playing in the pool when she was younger along with the new Crate Paper Poolside. This line is AWESOME! I <3 all the fun gold in this line!
I added some watercolor to my background. I wanted to use my Cameo to cut the rays, but I didn't have a cut file to do that with. So I took my Heidi Swapp sun burst mask and traced it on the black and white striped paper and cut them at different lengths. Love how it tuned out, plus it saved me a few dollars ;) I stitched the rays in place.
Here are some close ups:
Check out that gold frame! LOVE IT! The Hello Summer was fussy cut from one of the patterned papers. I added some stitching to that cute pink and yellow frame:
Check out that mason jar! Isn't it just the cutest? I added a few other embellies from this collection on top of it:
I cut part of the title on my Cameo and used Gelatos to color it. The Splish Splash is a sticker in this collection. And check out that gold heart, YUM!:
Hello and good morning... Happy
Tuesday!!! I'm trying to play catch up after being on vacation for ten
days and get back into the grind of things... and boy is it hard... It's
no secret that I've kinda been addicted to scrapping my son's baseball
photos lately.. I think I went through such a huge phase of scrapping
girl pages for my two daughters, I got away from boy pages. Maybe it's
the fact that he loves baseball so much, I can see it in the photos, so I
enjoy scrapping them more, I'm not sure. But the Cocoa Vanilla Made of Awesome collection is just that.... awesome. It's so fun and easy to work with, perfect for boy pages. Here is a page of him doing what he loves, running or stealing home and playing catcher:
I added a bit of twine in the background for a bit of texture. I added several of thedie cut ephemera pieces through out the layout:
Since
the Trigger Tuesday challenge involve a theme, this month has stars as
one of the them. I punched some stars from paper and then misted over
them to create this effect, along with added some of the vellum stars:
and mixed up my October Afternoon alphas for the title work:
So check out the store for a great boy line-Made of Awesome... You'll use it over and over again.. in fact, mine is almost all gone... Thanks sooo much for stopping by today and have a wonderful day!!!
In celebration of last weeks holiday, I created a layout inspired by the very fabric of our nation; the American flag. I created this page for this past Monday's Mix it Up challenge on the forum. I started my page with 13 paper strips, for the thirteen stripes in the flag. I than used 5 punched stars for the stars in our flag, and of course I used the colors red, white, and blue.
I started out my page with some basic black cardstock by Bazzill Basics. I wanted the dark background to help my papers really stand out.
I used a mix of paper strips cut from the following papers to create my background: Cloud nine by Crate paper , I am creative by Simple Stories , and Craftsman by Crate paper.
To dull the colors, helping add emphasis to my photo and title work, I layered my strips with a star vellum.
I wanted to play with some alphas in my title and photo surround. I started with some Simple Stories alphas from the sticker sheet which coordinates with the I am line. I chose a lighter toned alpha from Crate paper to finish off my title.
Using the same alphas along with a few others from my stash, I crated a repeat of the letters "X O" for a fun look around my photo of daddy with his girls! I punched 5 stars in two different sizes, stitched ontop one another in the super fun Studio Calico Amelia paper!
I added my splash of sequins and one more simple embellishment of a bright red banner from the collection pack by American Crafts Fine and Dandy collection. I chose to keep it basic without adding anything to let it stand out.
I hope I inspired you to create your own patriotic page!
Brianna
It's Saturday which means its my turn on the blog to share a fun summer layout I created with
Simple Stories' Summer Vibes collection! I love the warm muted colors of this line and of course the embellishments! Simple Stories rocks the selection of embellies including their fun
I love the Chipboard Frames as well! Here, I paired one with a couple of the Bits and Pieces with a Chipboard accents for my title.
I used a cut file from Just Nick Studios and filled in random spaces with patterned papers. At the bottom of my page, I used one of the Bits and Pieces and accented with a cut sun Bradz. Of course no layout is complete without a few coordinating Enamel Dots!
Showing one of the cute smaller Chipboard Frames that I layered under my photo!
I used one of the open rectangle spaces for my journaling!
Thanks for reading today! Hope this inspires you scraps some of your favorite summer photos!